


INTRODUCTION
Construction evidences with brickwork from many parts of the world reflects the existence of brickwork even from prehistoric time and the impossibleness of construction without bricks. Brick work is a masonry construction work using bricks and mortar. In simple joining bricks using mortar in a systematic pattern is called brick work. Mortar is a paste like substance used to bind the bricks together. It resembles the meaning of filling gaps between bricks.
IMPORTANT BRICKWORK TERMINOLOGIES
Bricks, beds and perpends simply form a brick work. Here, brick is an element made using clay, bed is basic layer of mortar which is buttered beneath a brick and perpends is the imaginary vertical line drawn along joints located between two bricks, which filled with mortar. The following diagram will describe more clearly.
Course – Arrangement of bricks continuously in a row or horizontal way is known to be course. Here the bricks are arranged in the same level and same side (headers or stretches) of brick faces out. Depending on the arrangement of bricks there are some types of course. The following diagram explains those types of courses.
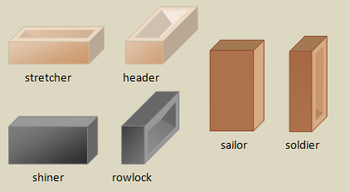
Stretcher course – When the long and narrow faces of bricks are arranged in the direction of the length of wall, then that course is called as stretcher course. The narrow and lengthy faces of the bricks are seen from the front elevation of the course. This course is used in construction where half thick wall partition is needed.
Header course – When the shorter faces of bricks are arranged in the direction of the length of wall, then that course is called as header course. The front elevation of header course resembles the shorter faces of the bricks and this course is used in construction where one brick thick wall partition is needed.
Soldier course –When the long and thin faces of bricks are arranged in the direction of the length of wall, then that course is called as solider course. The front elevation of solider course resembles the long and thin faces of the bricks and this course is used in construction where decorative works are needed such as chimney, above door or window. Other advantage of this type is being resistance to compressive strength.
Sailor course – Same as soldier course but the difference is here, long and thick faces of bricks are visible from front elevation of this type course.
Rowlock course –When a 90 degree turn is applied to the header course front elevation, the rowlock course is achieved. See the diagram to get clear idea. The narrow and shorter side faces of the bricks, of a row forms the rowlock course. This type of course is applied in sills of window or door and in where decoration is necessary such as garden.
 Shiner course – When a 90 degree turn is applied to the stretcher course front elevation, the shiner course is achieved. See the diagram to get clear idea. A row of bricks with long and broad faces form the shiner course.
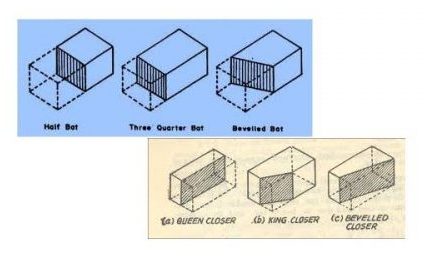
Bat & Closer – A piece of brick which helps to cover the space where a full brick can’t be placed. Bat is when a brick is cut through its width (length of the bricks change) and closer is when a brick is cut through its length (width of the bricks changes). Different types of bat and closer exist, depending on its shape. They are as follows,
Bond – The process of arranging bricks in a uniform pattern using mortar to bind the bricks is known as bond. Depending on the arrangement of bricks, number of bonding type exists. They are as follows,
- English bond,
- Flemish bond,
- Stretching bond,
- Heading bond,
- Garden wall bond,
- Facing bond,
- Raking bond,
- Dutch bond,
- English cross-bond,
- Zig-Zag bond,
- Silverlock’s bond.
TYPES OF BRICKS
Bricks can be classified into number of types on their manufacturing method, source material, size, texture, use and many more. Here, I consider the important types that are commonly in use within the construction field.
TYPES OF BRICKS DEPENDING ON THEIR MANUFACTURING METHOD
- Burnt bricks
- Sundried bricks
BURNT BRICKS
By burning the brick mould with the mixture in the kiln, the burnt bricks are produced. These are the commonly used bricks in the construction field as they possess some good qualities or properties. These burnt bricks further classified into 4 different types namely, 1st class, 2nd class, 3rd class and 4th class.

basiccivilengineering.com
SUN-DRIED BRICKS OR UNBURNT BRICKS
Sun-dried or unburned/unburnt bricks are moulded/molded and let-to dry in sunlight instead of burning them in a kiln or clamp. These types of bricks are not enough strength, less fire & water resistance. Widely these types of bricks are not used in construction but sometimes this type used to construct cheap & temporary structures.
TYPES OF BRICKS DEPENDING ON ITS PRODUCTION METHOD
Handmade or moulded
Machine made or moulded
HAND MOULDED
When the bricks are produced by moulding the raw materials of bricks using hands or manpower is known as hand moulded bricks. For hand moulded bricks, the mould is prepared using steel or wood. Again the hand moulded method can be classified into 2 types as, ground moulded &table moulded.
- Ground moulding
The cheap method of moulding when compare to table moulding. Here, first the ground is levelled and fine sand is sprinkled over it. Then the mould (brick shaped mould which has only side covers & no top and bottom cover) that dipped in water is placed on the ground and the mould is filled with clay. The excess clay is removed using any metal or wooden strike. The advantage of ground moulding is no production wastage. The drawback for the bricks that prepared using this type of moulding is deformation of bricks or formation of cracks due to excess water. Also, clay needs time to dry-up well which results in slow production (takes time to lift the mould).
- Table moulding
The moulding process is same ground moulding. But, the whole process is done on a specific table. (Commonly the size of the table is 2m X 1m) Thickness of the mud which used to mould the bricks should be maintained correctly (stiffer mud than ground moulding). Here, a mould box is joined with the table with two base plates, in which one is a loose plate and the mould can be operated by a lever using foot. Some use the similar mould box without fixing it to the table. The below diagrams show the both processes.

basiccivilengineering.com
MACHINE MOULDED
The brick produced by moulding the raw mixture using machine is known to be as machine moulded bricks. This method is more effective when considering the rate of production per unit time and quality of the bricks. Again the machine moulding method further classified into two as, plastic clay machine moulding and dry clay machine moulding.
- Plastic clay machine moulding method
Here the clay material is allowed to come out from an opening of the machine as a long continuous slab. Then the slab is cut to the thickness of bricks by wires that attached to a permanent frame and dried enough to get the final product. As it cut by wires the final bricks are called as wire cut bricks.
- Dry clay machine moulding method
In this method there is no need to temper the clay manually, as it done by the machine. The machine itself makes the raw material into a paste form and sends it to the brick moulds. Finally the bricks are produced by hard press of clay by the machine and which results to call these types of bricks as pressed bricks. In these pressed bricks frog is appeared and this frog is helpful to retain the mortar during brickwork.
TYPES OF BRICKS DEPENDING ON THEIR SHAPES
Other than regular rectangular bricks some bricks are exist to fulfill the other construction needs. Some structure need special shape of bricks to complete the construction especially in places like corners, bends, gaps and etc. Some sorts of bricks are as follows,

basiccivilengineering.com
TESTS TO IDENTIFY BRICKS
The distinctive characteristics of bricks are tested to identify the standard or quality ones to construct a quality structure. The tests can be performed in laboratory as well as on field. (Laboratory tests may need some special equipment). Water absorption test, examining the visual appearance of bricks, hardness test, testing the sound, examining the strength by crushing test or compressive test, testing the colour of bricks, testing the structure and size of bricks and by examining the presence of soluble salts – it also called as efflorescence test.
WATER ABSORPTION TEST – LABORATORY TEST
According to British standard, 2 ways of tests are available. One is 5hours boiling test and other one is 24hours cold immersion & absorption under vacuum.
5HOURS BOILING TEST
It is a standard method. Here bricks are under fully saturated condition where are all pores are filled up with water.
Apparatus that are needed
Water bath, Drying oven, laboratory balance to an accuracy of 0.1% and 10 bricks.
Assumption on this experiment
Specimen will attain the constant mass by heating for 48hours at 110 degree Celsius. When the bricks reach 110 degree Celsius temperature, we can start to calculate the 48hours (sometimes it takes time to reach 110 degree Celsius if the bricks are wet, when place them in the oven). Bricks should be arranged in a single layer and a space of 10mm should be maintained between the bricks and sides of the water bath.
Then cool them to room temperature (using, a ventilated room + spaces between bricks within water bath + circulation of air over the water bath / fan). When the bricks reached the room temperature, their weights should be measured and recorded soon as possible. Then heat the ricks to its boiling point and boil them continuously for another 5hrs. Now, allow the bricks to cool for room temperature naturally between 16 o 19hrs. Then take them out from water bath and wipe them using a damp cloth. Now weigh their weight within 2 minutes from the removal of brick from water bath.
Calculation formula
Water absorption = wet mass (R1) – Dry mass (R2) / Dry mass (R2) X 100
Finally, the average of 10 bricks is obtained to get the water absorption percent by mass. Check the above table for the grading of bricks depending on their water absorption percent by mass.
24HOURS COLD IMMERSION & ABSORPTION UNDER VACUUM
This is a works control test and here, water to be absorbed into pores which are easily filled under cold condition.
Apparatus that are needed
Water bath, Ventilated oven, laboratory balance to an accuracy of 0.1% and 10 or 3 bricks
Specimen will attain the constant mass by drying them in oven for more than 24hours at 110-115 degree Celsius. Then cool them to room temperature and maintain 24 ± 8 degree Celsius, humidity of 30 – 70% for nearly 1 hour. Record their weights by measuring to an accuracy of 0.1%. Now immerse the bricks in clean water at a temperature of 15-30 degree Celsius for 24 hrs. Then take them out and wipe them with damp cloth. Now weigh their weight within 2 minutes from the removal of brick from water bath.
Calculation formula
Water absorption = wet mass – Dry mass / Dry mass X 100
COMPRESSIVE STRENGTH LAB TEST ACCORDING TO BRITISH STANDARD
Apparatus needed
Compression Testing Machine, Cube Tank Vernier Callipers, Plywood Packing Material at least 5mm larger than the blocks and 10 bricks.
Ten bricks are measured individually using Vernieer Callipers at the mid-points of the brick to determine their width and length. The measurements are recorded to the nearest millimetre.
(The bricks are examined to determine whether they are cellular, frogged or perforated. Before testing can proceed they must first be prepared as follows:- Solid bricks, bricks with frog intended to be laid downwards, perforated bricks, cellular bricks:- All the ten bricks shall be saturated by placing them in the cube tanks for 24 hours. Bricks with a single frog intended to be laid frog upwards:- The bricks are immersed in the cube tank for not less than 24 hours to achieve saturation. They are then removed from the tank and allowed to drain for not less than 5 minutes and dried off to achieve a saturated surface dried condition. A mortar is prepared by mixing dry clean concreting sand and other rapid hardening cement in the proportion 1:3 (cement : sand) adding sufficient water to produce a creamy workable consistency).
The mortar is applied to the frogs as to ensuring the entire void is filled and the final surface is flush with the rim of the brick. Then the bricks are laid on the floor of the laboratory for 24 hrs and covered using damp sacking or polythene. All bricks are treated similarly thereafter bricks are immersed in water tank for 3 days. After the immersion period all the bricks shall be removed from the cube tanks, allowed to drain and the frog mortar checked for shrinkage, cracks and cavities. Any bricks showing such defects shall be rejected and further bricks prepared. Pieces of plywood shall be prepared in which the size of prepared plywood should not exceed the size of brick. Two pieces of plywood shall be placed symmetrically above and below each brick specimen. Then place them between the plates of compression testing machine. (New set of plywood should be used for each brick). The load is applied to the specimens by using the compression tester in the manual mode at a pace rate not exceeding 35N/mm2/min up to half the anticipated maximum load. Thereafter the rate is smoothly changed to 15N/mm2/min and this maintained until failure is indicated by a drop in applied load and stress cracks appear in the brick.
Calculation
Record the maximum load (in N) carried by the specimen during the test. Obtain the strength of each specimen by dividing the maximum load obtained by the appropriate area of the bed face. The average of 10 bricks is obtained as compressive strength of brick.
NOTE: It is necessary to adjust the controls of the machine continuously and smoothly to maintain a constant rate of loading.
EFFLORESCENCE TEST IN BRICKS
Apparatus that are needed
A shallow flat bottom porcelain dish containing sufficient distilled water to completely saturate the specimens
Procedure
Place the end of the bricks in the dish, the depth of immersion in water being 25 mm. Place the whole arrangement in a warm ( for example, 20 to 30°C ) well ventilated room until all the water in the dish is absorbed by the specimens and the surplus water evaporates. Cover the dish containing the brick with suitable glass cylinder to make sure excessive evaporation from the dish may not occur. When the water has been absorbed and bricks appear to be dry, place a similar quantity of water in the dish and allow it to evaporate as before. Examine the bricks for efflorescence after the second evaporation and report the results.
The liability to efflorescence shall be reported as,
Nil – When there is no perceptible deposit of efflorescence.
SIiglt – When not more than 10 percent of the exposed area of the brick is covered with a thin deposit of salts.
Moderate – When there is a heavier deposit than under ‘slight’ and covering up to 50 percent of the exposed area of the brick surface but unaccompanied by powdering or flaking of the surface.
Heavy – When there is a heavy deposit of salts covering 50 percent or more of the exposed area of the brick surface but unaccompanied by powdering or flaking of the surface.
Serious – When there is a heavy deposit of salts accompanied powdering and flaking of the exposed surfaces.
EXAMINING THE VISUAL APPEARANCE OF BRICKS, TESTING THE COLOUR OF BRICKS AND TESTING THE STRUCTURE AND SIZE OF BRICKS
In this test bricks are arranged as reference panel and sample panel. Using nearly 100 brick faces of average bricks that are randomly selected, a panel is erected. The panel should be erect as to withstand with weather and any other damages. The sample panel also erect using approved bricks in the same manner. Then both panels should view from same distance not exceeding 3m. (Can’t conclude from this manner but suitable for field quick testing).
DIMENSIONAL TOLERANCE
Twenty bricks are selected at random to check measurement of length, width and height. These dimensions are to be measured in one or two lots of ten each. Variation in dimensions are allowed only within narrow limits, ±3% for class one and ±8% for other classes.
HARDNESS TEST
In this test, a scratch is made on brick surface with the help of a finger nail. If no impression is left on the surface, brick is treated as to be sufficiently hard.
TESTING THE SOUND
Two bricks are taken, one in each hand, and they are struck with each other lightly. A brick of good quality should not break and a clear ringing sound should be produced.

No comments:
Post a Comment
Please feel free to comment regards this post